DiskDigger
Screenshots
DiskDigger for Android provides a reliable way to recover lost photos and videos from your mobile device. Accidents happen often when we manage digital files on a small screen. You might delete a precious memory by mistake or lose data during a system update. This application acts as a safety net for your digital life by scanning your storage for traces of deleted media.
The app works by digging deep into your device’s memory sectors. It bypasses the standard file system to find data that your phone marked as empty space. Even if you emptied your trash bin, the actual data often stays on the chip until new files overwrite it. This tool gives you a second chance to reclaim those files before they vanish forever.
How To Download And Install DiskDigger APK For Android
Losing important photos or documents can feel like a disaster. Fortunately, modern tools make it easy to reclaim your lost data. DiskDigger stands out as a powerful solution for Android users who need to recover deleted files. This guide explains how to download and install the DiskDigger APK quickly and safely.
Why Choose DiskDigger for Your Android Device?
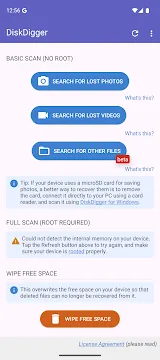
DiskDigger is a reliable tool that helps you undelete files from your internal memory or SD card. It works effectively for various situations, such as accidental deletions or formatting errors. The app offers two main scanning modes:
- Basic Scan: This mode works on all devices without needing root access. It searches for photos and videos in your cache and thumbnails.
- Full Scan: This advanced mode requires a rooted device. It scans your entire memory partition to find all types of files, including documents and music.
Pre-Installation Steps for Success
Before you start the installation, you must prepare your Android device. Android prevents the installation of apps from outside the Google Play Store by default. Follow these steps to change your settings:a
- Open the Settings app on your smartphone.
- Navigate to the Security or Privacy section.
- Look for an option labeled Unknown Sources or Install Unknown Apps.
- Toggle the switch to enable this feature for your web browser.
- Confirm your choice if a warning message appears.
How to Download the DiskDigger APK
To ensure you get the latest version, follow this straightforward process. Since you are downloading an APK file, you need a stable internet connection.
- Open your mobile browser.
- Visit Filetomob.com
- Search for “DiskDigger APK Download”.
- Navigate to the app page.
- Locate the Download button specifically for the Android APK.
- Tap the button and wait for the file to save to your device.
- Check your notification bar to see the progress of the download.
Step-by-Step Installation Guide
Once the download finishes, you can proceed with the installation. This process only takes a minute.
- Open your File Manager app.
- Navigate to the Downloads folder.
- Tap on the DiskDigger APK file you just downloaded.
- A prompt will ask if you want to install the application.
- Tap Install at the bottom of the screen.
- Wait for the progress bar to complete.
- Tap Open to launch the app immediately.
DiskDigger for Android: How It Works
Losing a precious photo or an important document on your Android device feels like a gut-punch. However, that data often still exists hidden in the digital shadows. DiskDigger is a specialized tool designed to pull those files back from the brink.
To use the tool effectively, you must understand the mechanics of how Android handles data and how DiskDigger bypasses standard system rules.
The Basics of File Deletion on Android
When you tap “delete” on a file, your phone does not actually erase the data immediately. Instead, the Android operating system performs a clever trick to save time and energy.
What Happens When You Press “Delete”
Android maintains an index, much like a table of contents in a book. When you delete a file, the system simply removes the entry from this index. It marks the space where the file lived as “available.” The actual binary data stays on the storage chip until a new file needs that specific spot.
The Difference Between “Trash” and Permanent Deletion
Modern Android versions often include a “Trash” or “Bin” folder within the Gallery or File Manager.
- Trash: Moves the file to a hidden folder for 30 days. Recovery here is easy.
- Permanent Deletion: Once the trash is emptied, the system ignores the file entirely. This is where DiskDigger begins its work.
Why Acting Fast is Everything
Data recovery is a race against time. Because the system views “deleted” space as empty, it will eventually overwrite your old photo with new data, such as a system update or a downloaded app. Once a new piece of data occupies that physical space, the old file is gone forever. To maximize your chances, stop using the phone immediately and run the scan.
Non-Rooted Recovery: The Standard User Experience
Most users do not “root” their phones because it can void warranties. DiskDigger still functions on these devices, but it operates with specific technical constraints.
What the App Can Access Without Root
Without root access, Android’s security “sandboxing” prevents DiskDigger from looking at the entire internal storage. Instead, the app focuses on areas it is allowed to see. It primarily scans your cache folders and thumbnail databases.
Cache and Thumbnail Recovery
Your phone creates small “preview” versions of every photo you view. Even if you delete the high-resolution original, the tiny thumbnail often remains hidden in a system cache. DiskDigger finds these survivors.
- It searches the .thumbnails folder.
- It scans app-specific caches.
- It pulls images from internal database files.
The Critical Limitation: Reduced Quality
The biggest drawback of the non-rooted method is quality. Since the app is only finding thumbnails, the recovered photos will be much smaller than the originals. They might look “blurry” or “pixelated” if you try to print them or zoom in.
Rooted Recovery: The Power User Experience
Rooting your device grants DiskDigger “Superuser” permissions. This changes the app from a simple scanner into a powerful forensic tool.
What Root Access Unlocks
Root access removes the digital blinders. DiskDigger can now look past the folders and talk directly to the hardware. It gains the ability to scan the entire file system partition.
Full Partition Scanning
Instead of looking for thumbnails, DiskDigger performs a “Deep Scan.” It examines every sector of the internal memory bit-by-bit. It identifies the “headers” of files—unique signatures that tell the app, “This is a JPEG” or “This is a PDF.”
Recovery of Original Quality and Non-Media Files
Because a rooted scan looks at the raw data, it offers several advantages:
- Original Resolution: You can recover the full-sized, high-quality photo exactly as it was.
- Non-Media Documents: While the standard scan mostly finds images, the rooted scan can find Word documents, ZIP files, and APKs.
- Video Recovery: Rooting significantly improves the chances of stitching together deleted video fragments.
By understanding these levels of access, you can set realistic expectations for your data recovery journey. Whether you are searching for a lost memory or a vital work file, DiskDigger provides a path to find what was lost.
DiskDigger: Recover Lost Photos on Android
Losing precious photos or documents feels like a digital disaster. Fortunately, DiskDigger for Android provides a powerful lifeline for recovering deleted data. This guide walks you through every stage of the process to ensure you get your files back safely and efficiently.
Choosing Your Scan Mode
DiskDigger offers two primary methods for finding lost data. Your choice depends entirely on your device’s permissions and your specific needs.
1. Basic Photo Scan
This option is available to everyone. It does not require “root” access to your phone’s operating system.
- How it works: The app searches through your device’s cache and thumbnails.
- When to use it: Use this for a quick, non-invasive search if you recently deleted a photo.
- Limitation: It usually recovers lower-resolution versions of your images because it pulls from thumbnail databases rather than the original file sector.
2. Full Scan
The Full Scan is the “pro” version of recovery. It requires a rooted device.
- How it works: DiskDigger gains deep access to the entire file system. It searches the raw sectors of your internal memory.
- When to use it: Use this when you need to find videos, documents, or original high-resolution photos.
- Benefit: This scan offers the highest probability of finding data that the system has marked as empty space.
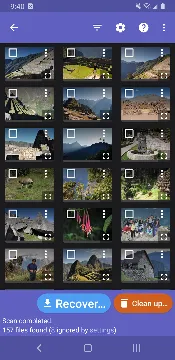
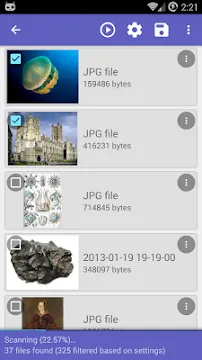
Filtering Your Results
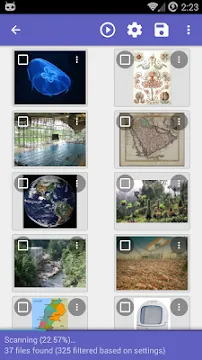
Once a scan begins, you will see hundreds—or even thousands—of files. Many of these are “junk” icons from other apps or system caches. You must filter these results to find your actual lost items.
Look for the Gear Icon (Settings) in the top right corner. Use these filters to save time:
- Minimum File Size: Set a minimum size (e.g., 100,000 bytes). This hides tiny system icons and UI elements.
- Date Range: If you know when you took the photo, set a specific date filter. This narrows the list to a manageable number.
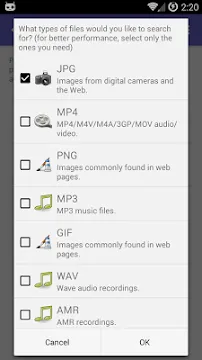
- File Type: Select specific extensions like JPG, PNG, or MP4 to ignore irrelevant file formats.
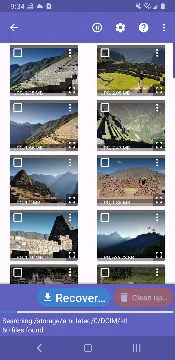
The Recovery Process
Finding the file is only half the battle. You must handle the actual restoration with care to avoid permanent data loss.
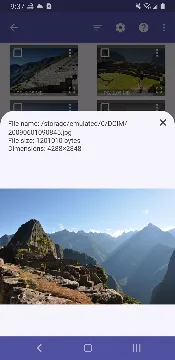
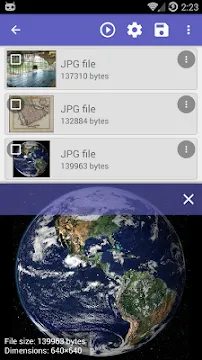
Previewing Files
Always tap on a file to see the Preview. This ensures the file is not corrupted. If the preview looks clear, you are ready to restore it.
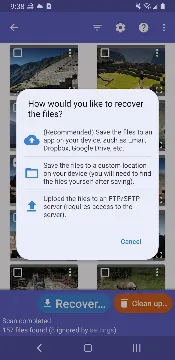
Saving the Files
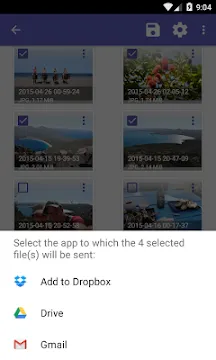
When you tap the “Recover” button, DiskDigger presents three distinct options. Each serves a different purpose:
- Save to App/Cloud: This is the most secure method. You can send files directly to Google Drive, Dropbox, or your Email. It moves the data off the physical device immediately.
- Save to Device: This saves the file to a local folder on your phone.
- FTP Upload: This is for advanced users. It sends the recovered data to a remote server or NAS.
The Golden Rule of Recovery
One crucial tip stands above all others: Never save recovered files back to the same partition where they were lost.
If you are recovering photos from your internal storage, do not save them back to an internal folder. Why? Because the act of “saving” writes new data. This new data might overwrite the very deleted files you are trying to rescue. Always use a cloud service or an external SD card as your destination.
By following these steps, you maximize your chances of a successful digital rescue. Take your time, filter your results, and always save to a safe location.
DiskDigger for Android: Choosing the Right Version for Your Data
Accidentally deleting a file feels like a digital disaster. Whether it is a cherished family photo or a critical work document, the panic is real. DiskDigger remains one of the most trusted tools for Android users facing this crisis. However, the app comes in two distinct flavors. Understanding the differences between the Free and Pro versions ensures you don’t waste time or money.
The Free Version:
The free edition of DiskDigger serves as a specialized recovery tool. It focuses almost entirely on visual media. If your goal is to bring back a lost selfie or a short video clip, this version usually suffices.
Key Features of the Free Version:
- Photo Recovery: It scans your device storage for JPG and PNG files.
- Video Scanning: It can locate MP4 and 3GP video formats.
- Basic Scan Mode: This mode works on non-rooted devices. It searches your “cache” and thumbnails to find traces of deleted images.
- Full Scan Mode: This requires “root” access. It searches the entire internal memory of the device for deleted file fragments.
Limitations to Consider:
While the free version is powerful, it has strict boundaries. It ignores many file types. You cannot recover documents, music, or compressed archives with this version. Additionally, the recovery process requires manual saving to local folders or email.
The Pro Version:
DiskDigger Pro caters to users who need more than just photo recovery. It transforms the app from a niche tool into a comprehensive file restoration suite. If your digital life exists in formats like PDF or DOCX, the Pro version is the necessary choice.
Why Upgrade to Pro?
- Expanded File Support: Recover over 20 different file types. This includes PDF, ZIP, DOCX, MP3, APK, and PPTX.
- Advanced Upload Options: You can upload recovered files directly to an FTP or SFTP server. This is vital if your phone storage is full or corrupted.
- Enhanced Cleanup: The Pro version includes tools to permanently wipe free space. This ensures that deleted data remains unrecoverable for privacy reasons.
- No Technical Barriers: It handles complex data structures better than the basic version.
Comparing Features
Choosing the right version depends on your specific needs. Look at how these two versions stack up against each other:
The Free Version excels at:
- Restoring deleted camera photos.
- Finding thumbnails of lost images.
- Testing if the app can actually “see” your deleted data before you buy.
The Pro Version is better for:
- Retrieving lost business documents or school assignments.
- Restoring music libraries or voice recordings.
- Securely transferring recovered data to a remote server.
The Verdict: Which One Should You Choose?
Deciding whether to pay for the Pro version comes down to the value of your lost data.
Stick to the Free Version if:
You only care about photos. If you accidentally deleted a few pictures from your gallery, the free version does the job perfectly. It costs nothing and provides high-quality results for standard image files.
Invest in the Pro Version if:
You lost a variety of files. If your “Downloads” folder vanished or you lost a critical ZIP archive, the free version cannot help you. Professionals and students should almost always opt for Pro. It offers the peace of most mind because it covers nearly every common file extension.
Data loss is stressful, but DiskDigger simplifies the solution. Start with the free version to scan your device. If you see your lost documents in the scan results but cannot select them, that is your signal to upgrade to Pro. Always act quickly, as new data on your phone can overwrite your deleted files forever.
DiskDigger for Android: Advanced Feature “Wipe Free Space” Explained
DiskDigger for Android is a famous tool for recovering lost photos and videos. However, it also offers powerful advanced features for your data security. One of the most important tools in the app is “Wipe Free Space.” This feature focuses on your digital privacy rather than just recovery.
When you delete a file on Android, the system does not immediately destroy the data. Instead, it marks the space as “free.” The original data remains hidden in the background until new files overwrite it. Anyone with a recovery tool could potentially see your private photos or documents. DiskDigger solves this problem by cleaning that hidden data for good.
Understanding the Privacy Side of DiskDigger
Privacy is about control over your information. Many users feel safe after they hit the delete button, but the “ghosts” of their data stay on the storage. DiskDigger acts as a digital shredder for these ghosts.
The app protects your privacy in several ways:
- Prevents Unauthorized Access: It ensures that if someone finds or steals your phone, they cannot use recovery software to peek at your deleted history.
- No Data Collection: The app itself does not upload your personal files to external servers. It works locally on your device.
- Security for Sales: It provides peace of mind when you prepare to give your device to a new owner.
By using the advanced features, you move beyond basic file management. You take active steps to secure your personal life.
How to Use “Wipe Free Space” Effectively
The “Wipe Free Space” feature is designed to make deleted files unrecoverable. It fills the empty parts of your storage with random data. This process overwrites the traces of your old files.
Follow these steps to use this feature:
- Open the App: Launch DiskDigger on your Android device.
- Select the Function: Look for the “Wipe free space” button on the main screen.
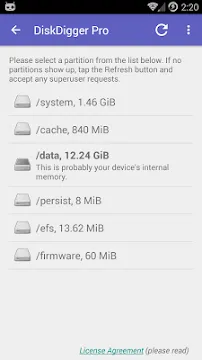
- Choose Your Partition: Select the part of the memory you want to clean. Usually, this is the internal storage or an SD card.
- Pick the Cleaning Method: The app may offer different types of overwriting. For most users, a single pass is enough to stop standard recovery tools.
- Start the Process: Tap to begin. Keep your phone charged during this time because the process can take a while depending on your storage size.
Why You Should Wipe Before Selling a Phone
A factory reset is often not enough to protect you. Many factory resets only clear the file index, leaving the actual data blocks intact. If you sell your phone without a proper wipe, the buyer could potentially recover your bank statements, private photos, or login details.
Using DiskDigger before selling creates a “clean slate.” It ensures that the free space is truly empty and contains no remnants of your identity.
Key Benefits of a Deep Wipe:
- Total Peace of Mind: You know your personal data is physically gone.
- Professional Standard: It uses methods similar to how experts secure sensitive hardware.
- Efficiency: It targets only the free space, so it does not delete your current, active apps and settings.
Always remember that once you complete this process, the deleted data is gone forever. You cannot undo a “Wipe Free Space” action. Ensure you have backed up everything you want to keep before you finalize the wipe. This simple step makes you the master of your own digital privacy.
Using DiskDigger For Android Video Recovery
Losing a precious video feels like losing a piece of your history. Whether you accidentally deleted a birthday clip or lost a travel vlog during a system crash, the panic is real. DiskDigger for Android offers a powerful way to reclaim those lost files. However, recovering video is quite different from recovering a simple photo.
Understanding how video storage works will help you set realistic expectations. This guide explores the unique challenges of video recovery and how to get the best results from DiskDigger.
The “Fragmented” File Problem: Why Videos Are Different
When you delete a photo, the phone usually marks one continuous block of space as “available.” Finding and restoring that single block is relatively straightforward. Videos, however, are much larger and more complex.
To save space and manage memory efficiently, Android often breaks video files into smaller “chunks.” Instead of sitting in one neat row, your video data might be scattered across different parts of your storage drive. This is known as fragmentation.
Why fragmentation makes recovery difficult:
- Missing Links: DiskDigger must find every single chunk of the original file to recreate the video.
- Overwritten Data: If even one small chunk of the video is overwritten by a new app or a different file, the entire video becomes incomplete.
- Reassembly Errors: Sometimes the recovery tool finds the pieces but struggles to put them back together in the correct order.
Because photos are small, they rarely fragment. Videos almost always do. This is why you might successfully recover 100% of your deleted photos but only 50% of your deleted videos.
Restoring Playability: Dealing with Corrupted Files
You might feel a rush of joy when DiskDigger shows a “successful” recovery. You click “Play,” but the screen stays black, or the app says the file format is unsupported. This happens because of the fragmentation mentioned above.
Even if DiskDigger finds the majority of the data, the header information or specific frames might be missing. When this occurs, the file is considered “corrupted.”
What to do if your video won’t play:
- Don’t panic: The data is likely there, but the file structure is broken.
- Use a Video Repair Tool: After saving the file from DiskDigger, move it to a computer or use a dedicated “video repair” mobile app.
- Repair the Metadata: These tools analyze the broken file, fix the index, and try to make the video readable for standard players again.
DiskDigger does the heavy lifting by digging the data out of the “digital dirt.” However, a specialized repair tool acts as the surgeon that sews the pieces back together.
Pro-Tip: Mastering the Filters
When you run a scan for videos, you might feel overwhelmed. DiskDigger often finds thousands of files. Most of these are not your deleted videos. Instead, they are tiny video ad fragments, cached clips from social media apps, or UI animations.
How to find your files faster:
- Use the “Smallest File Size” Filter: Go into the DiskDigger settings before or during the scan.
- Set a Minimum Threshold: Set the minimum file size to at least 5MB or 10MB.
- Filter Out Junk: Most video ads are very small (under 1MB). By setting a filter, you hide the clutter and only see the larger files that are likely your actual recorded videos.
This simple step saves you hours of scrolling through “junk” data. It allows you to focus your energy on the files that actually matter.
How to Maximize Your Success Rate
The moment you realize a video is gone, stop using your phone. Every new photo you take, every app you update, and every song you download could overwrite the very chunks of data you are trying to save.
- Turn on Airplane Mode: This prevents background apps from downloading data.
- Run DiskDigger Immediately: The sooner you scan, the less likely the data has been overwritten.
- Root for Better Results: While DiskDigger works on non-rooted phones, “Root” access allows the app to search the entire internal storage, significantly increasing your chances of finding fragmented video parts.
By understanding these challenges and using the right filters, you give yourself the best possible chance of seeing those captured moments again. Success requires patience, the right settings, and sometimes a little help from a repair tool.
DiskDigger: Recovering Files from SD Cards vs. Internal Storage
Recovering lost photos or videos from your Android device can feel like a race against time. DiskDigger is a powerful tool for this task, but its success depends on where your files lived. The process changes significantly between internal storage and SD cards.
Understanding Internal Storage Recovery
Most modern Android phones use internal storage as the primary home for your data. This area is highly protected.
- Encryption Hurdles: Android encrypts internal storage by default. This security measure keeps your data safe from hackers, but it also makes data recovery difficult.
- The Basic Scan: If your phone is not rooted, DiskDigger performs a “Basic Scan.” This scan only searches your cache and thumbnail databases. You will likely find lower-resolution versions of your photos rather than the original files.
- The Rooted Full Scan: To find original files on internal storage, DiskDigger needs “Root” access. Rooting your phone gives the app permission to bypass system restrictions. Once rooted, the app can perform a “Full Scan” to dig through the actual memory sectors.
Why SD Cards are Easier to Manage
SD cards offer a much higher success rate for file recovery. They do not face the same strict encryption layers as the internal system memory.
- Partition Treatment: DiskDigger treats an SD card as a separate partition. It can access the file system on the card more directly than it can with the phone’s system partition.
- Direct Access: Because SD cards are often formatted in FAT32 or exFAT, DiskDigger can easily scan the directory structure. You often don’t need root access to find deleted files on an SD card.
- Faster Results: The app can scan an SD card quickly. It looks for “orphaned” data that the system marked as deleted but has not yet overwritten.
Moving to the PC for Better Results
Sometimes the Android app hits a wall. If your SD card is corrupted or the app cannot see the files, you should switch to a computer. Using the Windows version of DiskDigger is often the most effective “Plan B.”
Step 1: Connect the Card
Remove the SD card from your phone. Use a USB card reader to plug it into your PC. This avoids the limitations of the Android operating system entirely.
Step 2: Sector-by-Sector Analysis
The Windows version of DiskDigger is more robust than the mobile app. It performs a deep, sector-by-sector analysis. It ignores the file system and looks for the unique “signatures” of files like JPEGs, MP4s, or documents.
Step 3: Bypass Android Restrictions
Windows sees the SD card as a physical disk. This allows DiskDigger to bypass any software glitches occurring on your phone. It can read “raw” data that an Android app might skip.
Pro Tips for Successful Recovery
To increase your chances of getting your data back, follow these simple rules:
- Stop Using the Device: As soon as you realize files are missing, stop saving new data. New files will overwrite the “deleted” space.
- Use Airplane Mode: This prevents the phone from downloading background data or updates that could overwrite your lost files.
- Check the PC Version First: If the data was on an SD card, many experts suggest skipping the mobile app and going straight to the PC version for a more thorough search.
DiskDigger provides a lifeline for lost memories. By understanding the difference between internal memory and SD cards, you can choose the right path for recovery.
DiskDigger: Privacy & Security
Losing important photos or files on your Android device feels like a disaster. You might feel a sense of panic as you search for a way to get those memories back. DiskDigger is a popular choice for many users in this situation. However, installing an app that digs into your phone’s memory can raise questions about privacy. You might wonder if the app is safe to use.
Is DiskDigger Safe to Use?
DiskDigger is a highly respected tool in the world of data recovery. It has maintained a solid reputation for over a decade. Millions of users trust it because it performs its primary job without hidden agendas. The developer, Defiant Technologies, focuses on functionality rather than data harvesting.
When you use the app, it does not bundle malware or spyware. It follows standard security protocols to ensure your device remains healthy. You can feel confident using it to scan for lost files.
Understanding the “All Files Access” Permission
Modern Android versions are very strict about security. When you first open DiskDigger, it asks for “All Files Access.” This request might look scary, but it is necessary for recovery.
- Deep Scanning: The app must look through every folder to find bits of deleted data.
- System Barriers: Standard permissions only allow apps to see “active” media files.
- Accessing the Void: Deleted files often hide in hidden directories or system caches that require broad access to reach.
Without this permission, the app cannot do its job. It would only see the files you already have. Granting this access allows DiskDigger to peek into the corners of your storage where deleted data still lives.
Enhancing Privacy with Offline Recovery
One of the best features of DiskDigger is its ability to work entirely offline. You do not need a Wi-Fi or cellular connection to scan your phone. This is a major win for your data privacy.
Since the app works locally, your sensitive files never have to travel over the internet during the scan. You can turn on Airplane Mode and still recover your photos. This local processing ensures that no one can intercept your data while the app searches for your lost files.
The Reliable “No-Cloud” Guarantee
Many modern apps try to force you into cloud storage. They might automatically upload your photos to a private server “for safekeeping.” DiskDigger does not do this. It respects your right to choose where your data goes.
- You Are in Control: After a scan, you decide which files to keep.
- Manual Selection: The app only moves files when you explicitly tell it to.
- Flexible Destinations: You can save files back to your phone, an SD card, or an email address.
This “No-Cloud” approach means your private photos remain under your control. The app does not maintain a secret database of your images in the background. Your data stays on your device unless you decide otherwise.
Final Thoughts on Security
DiskDigger provides a transparent experience for Android users. It explains why it needs permissions and keeps your data local. If you need to recover a lost photo, you can trust this app to handle your device with care. It remains a safe and effective tool for regaining your digital life without sacrificing your privacy.
Master the DiskDigger Pro “Clean Up” Feature
Most Android users know DiskDigger as a lifesaver for recovering deleted photos. However, the Pro version hides a powerful maintenance tool that many overlook. The “Clean Up” feature acts as a surgical strike against digital clutter. While standard system cleaners often skim the surface, DiskDigger dives deep into the file system to reclaim lost storage.
Understanding the “Clean Up” Advantage
Standard cleaning apps usually target temporary files or browser history. In contrast, DiskDigger targets “orphan” files and persistent cache remnants. These files remain on your device even after you uninstall the parent application. Over time, these ghosts occupy gigabytes of space, slowing down your operating system.
Why Use the Clean Up Feature?
- Reclaim Hidden Space: Find files that your phone’s default “Storage” settings cannot see.
- Remove Thumbnail Bloat: Android creates small versions of every image you view. These “thumbnails” often stay on your disk forever.
- Delete Orphan Data: Wipe out folders left behind by apps you deleted months ago.
- Improve System Speed: A less crowded disk allows the OS to index files faster.
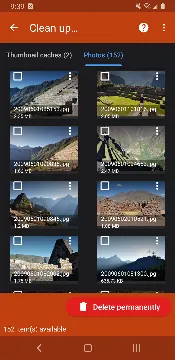
Step-by-Step Guide: How to Use the Feature
To get started, ensure you have the Pro version installed. Follow these steps to optimize your device:
- Launch DiskDigger Pro: Open the app and grant the necessary root permissions if your device is rooted. (Note: The cleaner works on non-rooted devices too, but with slightly less reach).
- Locate the “Clean Up” Button: You will find this option on the main screen, separate from the basic photo scan.
- Initiate the Scan: Tap the button to start the indexing process. The app will now crawl through your internal storage.
- Review the Results: DiskDigger categorizes findings into types like “Thumbnails,” “Logs,” and “Cache files.”
- Select and Wipe: Check the boxes for the items you wish to remove. Tap “Clean Up” to finalize the deletion.
The Power of Wiping Free Space
Beyond simple deletion, the Clean Up suite offers a “Wipe Free Space” option. This is the ultimate “pro” hack. When you delete a file normally, the data stays on the disk until new data overwrites it. This makes your old data vulnerable to recovery by others.
By using “Wipe Free Space,” DiskDigger fills the empty sectors of your storage with random data. This process ensures that your previously deleted private files remain gone forever. It essentially “shreds” the digital ghosts on your device.
Important Safety Tips
Because DiskDigger is a powerful tool, you must use it with care. Always scan the list of files before hitting the delete button. While the app is smart, it may flag large files that you actually intended to keep.
Furthermore, run this cleanup once a month. Frequent deep cleaning is unnecessary and can put slight wear on your flash storage. A monthly routine keeps your Android device lean, fast, and private.
By mastering these hidden settings, you transform a simple recovery tool into a complete storage management suite. Stop letting orphan files dictate your storage limits and take control of your device today.
Frequently Asked Questions About DiskDigger For Android
How does the recovery process work?
The app scans your device’s storage. It looks for traces of deleted files. When you delete a file, Android marks that space as free. The actual data stays there until overwritten. DiskDigger reads those leftover data fragments. Then, it rebuilds the original files. You can preview found items. Finally, you select and save them.
Does DiskDigger require root access?
You can use the app on both rooted and non-rooted devices, but the performance differs:
- Non-Rooted Devices: The app performs a “Basic Scan.” It searches your thumbnails and cache. This is usually enough to recover photos, but the quality might be lower than the original.
- Rooted Devices: The app performs a “Full Scan.” It searches the entire file system for any trace of photos and videos. This method is much more effective for finding high-resolution files.
Can it recover files other than photos?
The free version of the app focuses primarily on photo and video recovery. If you need to recover documents, archives, or music files, you generally need the Pro version of the application.
Can DiskDigger permanently delete files?
Yes, the app includes a “Wipe Free Space” feature. This is the opposite of recovery. It fills the empty parts of your storage with random data so that deleted files can never be recovered again. This is a great security measure if you plan to sell your phone.
What types of files can DiskDigger recover?
DiskDigger focuses mainly on images. It finds JPEG, PNG, and GIF files. It also supports documents and other common formats. However, success depends on your device. For example, older Android versions offer better recovery chances. Newer devices use file-based encryption. That makes recovery harder.
Can I save recovered files to my SD card?
Yes. You can save recovered files to an SD card. You can also send them via email or upload to cloud storage. Do not save files back to the same internal memory. That might overwrite other lost data. Always choose a different location first.
Does DiskDigger work on all Android versions?
It works on Android 2.1 and higher. That includes modern versions like Android 13 and 14. However, each Android update adds new security layers. For instance, Android 6 introduced adoptable storage. Android 7 added direct boot. Android 10 enforced scoped storage. These features limit raw disk access. Therefore, results vary by version.
How long does a scan take?
Scan time depends on storage size. A 16GB device might take five minutes. A 128GB device could take thirty minutes. The deep root scan takes longer than the basic scan. For best results, connect your device to a charger. Keep the screen active. Do not close the app during scanning.
What should I do before recovery?
Stop using your phone right away. Turn on airplane mode. Do not install new apps. Do not take photos or download files. Every action risks overwriting your lost data. Then, download and install DiskDigger. Run the appropriate scan for your situation.
Can DiskDigger recover messages, contacts, or call logs?
No. DiskDigger specializes in media files and documents. It does not scan databases for SMS or contacts. For those items, you need a different backup solution. Always enable Google Drive or local backups for your messages and contacts.